Wednesday, January 29, 2025

More DotS

Despite my little detour into Cold War gaming, I haven't forgotten Dominion of the Spear (DotS)

An Expansion
The author Steve has already put out an expansion - 36 Ancient Battles for Dominion of the Spear
You can find a detailed description at Wargame Vault.

I already purchased my copy. I look forward to playing all these battles! Stay tuned for battle reports.

My Boxed Set
I'm putting together a boxed set for DotS. I'm creating two new counter armies specifically for the box. I'm going with the classic Red vs. Blue.

If I did my math correctly, each army should have enough counters to make any force listed in the main book.

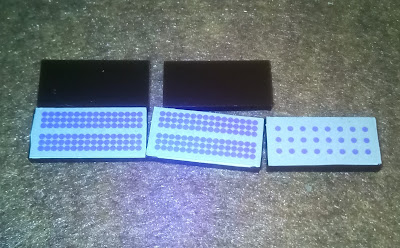
Here is my completed Red army.
Flanks: Missile (left) and Melee Mounted
Upper middle: Missile (top) and Melee Infantry
Middle: Leader
Lower middle: Chariots (Melee on the flanks, Missile in the middle)
Bottom: Elephants

To save space and money, I made the counters double-sided - melee on one side and missiles on the other. For example, I have 6 infantry stands with melee on one side and missile on the other. Therefore, I can field either (a) 6 melee infantry, (b) 6 missile infantry, or (c) any mix of melee and missile up to a total of 6 units.

The Red army is done. I am still working on the blue army.

Leaders
DotS does not have separate leaders. Instead, leaders are factored into a unit's rating. But I like having leader counters, so I made one.

I'm still not sure how to use them in games. Steve made an excellent comment on this post about a lack of evidence about them switching units. Still, I think the idea is plausible despite a lack of evidence. I'm wrestling about it now.

At least, I can attach a leader permanently to a unit, kind of like DBA.

Campaigns
Once my box set is complete, what do I plan to do with it?
  • Great battles - Play through the 36 battles in the DotS expansion.
  • Pyrrhus - Two stages
    • Replay the Pyrrhus vs Rome campaign I did using MicroBattle.
    • Play Pyrrhus vs. Carthage on Sicily. I planned on doing this with MicroBattle. I may play it with both rules sets and compare the results!

Saturday, January 25, 2025

Cold War Convoy

In keeping with my Red Dawn craze, I played a quick scenario using my MicroBattle rules.

Somewhere in the US, The year 1984. 

A Soviet (brown) column is heading down a road. American insurgent forces (gray) strike, destroying the infantry at the head of the column.

The Soviets take damage, but they drive a squad of insurgents out of the woods.

They pursue.

But this opens the Soviet tank to short-range fire. Kaboom!

The rest of the column turns around and flees!

Game Notes
  • I initially created the counters for sci-fi battles. They may not look exactly like Soviet vehicles of the time period, but they'll do as stand-ins.
  • I haven't mounted my green army yet. When I do, Americans will be green.
  • I assume that the American infantry have anti-tank weapons. In addition, the heavy infantry (oval around a dot) have mortars.
  • I would ultimately like to add helicopters to the mix. Need to make some new counters!

Thursday, January 23, 2025

Wolverines!

Ah, GADD (gamer's attention deficit disorder) has struck again!

My New Inspiration
It's all because of this movie.

I finally watched it last weekend. It gave me a hankering for some Cold War action.

If you are unfamiliar with the movie, here is the Wikipedia description.

The Project
How to go about gaming this?

Well, I don't think I will reprise the movie itself. Instead, I'm considering an "inspired-by" approach gaming a Soviet invasion of the U.S. in the 1980s.

I have some generic counters I can press into service.

I'd like to have each counter represent a squad or team of infantry or a single vehicle.

For rules, I'll likely tweak MicroBattle for my needs. I am researching rules, looking for some ideas on handling the different weapon types. For example, how can I include helicopters and RPGs? Also, how do I adjust the rules so that guerrillas have a fighting chance against regular force? I welcome any suggestions!

Rather than battling in the Rockies, like Red Dawn, I may set battles in my home state of Florida. Perhaps a Cuban invasion in support of the main Soviet effort.

Tuesday, January 21, 2025

RETROSPECTIVE: Dragon of Icespire Peak

Back on my old blog, I ran a feature called Retrospective. Inspired by Grognardia, I used this series to discuss games that impacted my approach to the hobby.

Well, now that I finished Dragon of Icespire Peak, I decided to look back at it and how it changed my solo RPG approach.


The Beginnings
Before I began this campaign, I was big into Four Against Darkness. However, I had some gripes so began looking for something a little different. Not finding what I wanted, I decided to create my own rules set for solo roleplaying. Along with the new rules, I created a new character to use for testing. And thus Killian and his companions were born. 

Long and Winding Road
It took me nearly 3 years to finish the campaign. This is because I would often let the campaign sit for months between sessions. I think I was having trouble coming up with an effective approach to playing solo RPGs.

The Traditional Approach
At first, I tried to run the games using a traditional approach. In a typical RPG, the players will go through a dungeon room by room, with the GM describing each room in turn.

To achieve this solo, I referred to the dungeon map, made a plan about how I would traverse the dungeon, then read the descriptions for each room in turn. It worked, but not well. I have some ideas on why.
  • Spoilers! There would be references in the intro and sometimes in room descriptions that gave away encounters.
  • Empty Space. A lot of rooms are empty, at least for combat encounters. Reading a description and then going to the next is rather boring. I assume that the empty rooms are designed for the next point.
  • Suspense? It seems that many of the adventures in the module were short on combat but high on suspense. Here is where empty rooms can work. The GM can describe the rooms in a way to  keep the adventurers on their toes. This would make the adventure interesting. But it just doesn't work for solo. I can't really keep myself in suspense.
  • Needs more swords! As I mentioned above, combat encounters are few. I guess this is because D&D combat is now so complex it takes forever to finish. But I prefer combat and my system can handle a lot of fights in a short time. So again, the traditional approach did not work well.
Random Encounters Approach
Because I was dissatisfied with the way the campaign was progressing, I changed my strategy. I would not do each room. Instead, I created a simplified map of the dungeon, such as this one of Axeholm.


I then randomly generated encounters for each area. This generated that sense of suspense. I knew what I might encounter, but I never knew if I would or when.

Because encounters are so slim in the module, I found that I needed to add more monsters to make this approach viable.

This approach worked OK. But it required some effort to convert the published adventure to one ready for the random approach. I sometimes had trouble doing this. The Woodland Manse was an example. The manse is fairly small so it did not lend itself to this approach.

The MicroDungeon Approach
Back in December, I outlined an approach for abstract, quick-play fantasy adventures. I initially called it Pocket Dungeon but have since changed the name to Micro Dungeon (MD). The main feature of MD is that I dispense with a formal map and instead have abstract encounter areas, leading to the main boss. I'm still playing around with the idea but it seems that it allows me to set up and play an adventure very quickly.

I used the MD approach for the last 4 adventures of the module. If I hadn't switched to MD, I think I still wouldn't be done!

Thoughts on Icespire
Throughout the campaign, I had multiple complaints about the Icespire Peak module itself. In hindsight, what did I think?
  • I like the overall concept. A series of adventures leading to a climatic showdown with the big bad.
  • For the most part, however, the big bad did not really appear in my campaign. There is a mechanism to determine where the dragon is at any point in time. I did not use that; instead I treated the dragon as a wandering monster. It only appeared once, briefly, in the campaign. Perhaps I should have used the module's mechanism, but I'm unsure if it would have helped. There should have been a planned off-screen encounter where the dragon attacks Phandalin while the party is gone. That would have upped the stakes and made the dragon seem like a more existential threat.
  • There is a second major quest line - a fight against agents of the evil god Talos. I did not particularly care for that. It seemed like a distraction from the main quest.
  • The individual adventures seemed a bit lackluster. I think this is because I'm used to old school modules where there is a lot more monsters and combat.
  • Nevertheless, it delivered a fun narrative and some good games.
The Path Forward
What next for my RPG experience?
  • The MicroDungeon approach works well for me. Quick, but fun encounters.
  • I would like to continue Killian's adventures. There is a follow up module called the Storm Lord's Wrath. I have already purchased the module.
  • I would like to test my MicroDungeon rules using lower level monsters. This has me thinking on starting a new campaign with level 1 characters. I have some options for this.
    • Run the Lost Mine of Phandelver. But after Icespire Peak, I'm a little wary of a 5e product. And I'm not sure I want to adventure in Forgotten Realms anymore.
    • Get an old-school module, perhaps Keep on the Borderlands. I could set it in my own campaign world.
    • Just create random adventures and see where it all goes.
I'm just not sure what I want to do next. Stay tuned and find out!

Saturday, January 18, 2025

Storming Icespire Peak

A Ser Killian Micro Dungeon Adventure

Spoiler Alert - This is another adventure loosely based on D&D's Dragon of Icespire Peak. Even so, it may have some spoilers. You may not want to read this if you plan to play that adventure.

The Story So Far
Ser Killian and his retainers, Haiden the squire, Martin the cleric, and Nashad the man-at-arms, have recently recovered the sword of dragon-slaying from the dragon barrow and defeated the orc marauders plaguing the land.

Only one enemy remains - the white dragon of Icespire Peak.

Approaching Icespire Peak
Icespire Peak lies deep in the Sword Mountains. On a clear day, one can see the peak from miles around. Getting to it, however, is supposedly no easy feat.

But our heroes must be blessed by Daeus. They manage to traverse the perilous climbs of the peaks without significant incident. At one point, a band of harpies swoop down on the party but they disperse the creatures without too much difficulty.

And thus they arrive at Icespire Peak.

I think it is supposed to be more difficult getting to the Peak. There were some things to do just to find the way, for example. I just dispensed with all that. I did add some encounters to represent travel. But due to good dice rolling, our heroes managed to bypass most of those encounters.

The Dangers of Icespire Keep
Our heroes come upon an ancient keep built near the summit of the peak.

Taking up residence in outer works is a band of orc brutes. They attack the party. Martin smites one with divine power while Haiden and Nashad make short work of the rest.

In the main keep, our heroes run across another party of adventurers. At first, Killian is pleased to meet them and proposes to join forces.

"Be off with ye," the leader exclaims. "The dragon's treasure is all ours!"

Killian explains that he is not interested in the treasure. He just seeks to destroy the dragon.

"Ye take me for a fool? Ye'd be crazy to challenge the dragon!" the leader replies. Clearly, he does not trust Killian. With that, the leader gives the sign and a barrage of arrows rain down upon Killian and his men.

"Right, that does it!" Killian exclaims. "Charge!"

Martin unleashes a ball of fire but misses the target. Haiden and Nashad draw out bows they brought for use against the dragon. Their return volley strikes down some of the enemy. Then they follow Killian into melee.

The battle ends quickly. Our heroes make short work of the enemy.

The Dragon
The party reaches the roof of the keep. There, they find the white dragon asleep.


Haiden and Nashad are armed with bows. They loose arrows at the beast. Martin flings a fireball. All miss.

The dragon takes flights, swoops at the party, and breathes a cone of ice. Haiden is caught in the cone but the others manage to dodge.

The dragon attacks, striking Haiden and Martin with its claws. They manage to get in strikes as it flies by.

Again and again, the dragon swoops down on the party, wounding them. They manage a few hits in return. Then the dragon breathes ice again. Haiden is hit. He falters, and kneels. He is badly wounded. Martin rushes over to heal him.

The dragon swoops down at Haiden, looking to deliver the coup de grace. But Martin launches another fireball, which catches the dragon's wing. It spins to the ground.

Though wounded, the dragon still has plenty of fight. It recovers and charges Martin and Haiden. But Killian comes running, and interposes himself between the dragon and Killian's friends. As the dragon's maw closes on Killian, he strikes with the sword of dragon slaying. The sword pierces through the roof of the beast's mouth. It howls in rage and pain, and thrashes wildly. The sword, seemingly with a will of its own, buries deeper into the dragon's skull. With a final howl, the dragon crashes to the ground, dead.

Aftermath
Our heroes return, wounded but victorious, to Phandalin. They are showered with gifts from people all through Neverwinter who are grateful that the dragon is gone. Killian uses the money to finish building a church, with his old cleric, Winston, as pastor. Killian displays the sword and one of the dragon's teeth in the church. This draws visitors to the church. Phandalin, and Neverwinter, prosper.

The End

GAME NOTES
Thus ends the adventure of the Dragon of Icespire Keep. What next? Stay tuned to find out.

Some notes about this adventure:
  • This post recounts my second battle vs. the dragon. The heroes won in the first, but I forgot that Killian had the sword of dragon slaying. I wanted to include it in the narrative so I replayed the fight.
  • Nevertheless, Killian was useless through most of the fight. Haiden and Martin were the real heroes. I hope this account gives them due credit.
  • When the dragon was down to 1 hp, I gave Killian the first attempt to hit. He did, and killed the dragon. I embellished the account a little bit.
  • Killian's problem was that he was only armed with a sword and the dragon was flying. When the dragon swooped down, I had melee-armed heroes pass a test just to attack. More often than not, Killian failed these tests. I guess his armor weighed him down.

Thursday, January 16, 2025

Mercians vs Welsh

I got the idea for a Mercian vs. Welsh battle from a recent post on The Wargames Website. I converted it to Dominion of the Spear (DotS)

Deployment
I used the early Saxons list for the Mercians (top). They are deployed thusly:
  • Battleline: Ferocious spears, ferocious spears with leader (Penda), spears
  • Reserve: 2 spears
Again, due to a lack of counters, I'm using light infantry for the ferocious spears

There is no list specifically for the Welsh. I decided to use the Britons one but I changed the 2 cavalry to a ferocious foot.

Here is their deployment:
  • Battleline: spears, archers, spears
  • Reserve: spears, ferocious spears with leader

Note that I added leaders. This is not standard with DotS. They are more window dressing than anything else. I also added a couple of terrain pieces just for looks. They have no impact on the game.

The Battle
On the left, the Welsh spears and Saxon huscarls wipe each other out. Penda and his hearthguard survive the rain of Welsh arrows.

But a second volley destroys the hearthguard. Penda manages to survive. Meanwhile, the Welsh leader and Mercian spears fill in on the flank.

Penda calls up his remaining spears. They take revenge on the archers.

Penda then wipes out the reserve spears.

As Penda positioned his spears for a flank attack, he Mercian spears wipe out the Welsh right.

The remaining Welsh retreat. Victory for Penda!

Notes
I made a couple of changes to the rules to add a little spice.
  • I rolled initiative each turn to determine the attacker for the turn.
  • The attacker could choose the direction of attacks, left to right or right to left.
As I mentioned, the leaders were mostly window dressing; they did not affect the ratings of the unit to which they attached. At the start, they were already with ferocious foot. I thought an additional bonus would be too much.

However, I did check to see the leader's fate if his unit routed. In this case, Penda survived. I'm not sure what I would do if the leader died. Perhaps roll morale to see if another unit breaks? Well, we'll deal with it when it comes up. I will use leaders more. It seemed especially appropriate for a Dark Ages battle.

Tuesday, January 14, 2025

The World Breaker Breaks

Sir Roderick is at it again.

I had some free time one morning and decided to play a few encounters of Demonslayer. Roderick defeated a demon lord in his previous outing so I reset the board and his health, and started again.

Here is his path, starting at the red star and ending at the red shield. Black X's mark encounters.

Here is the diary of his encounters.

I only planned to play a few encounters, but I kept going. I wanted to end with a good fight, but Roderick is pretty powerful now so combat was generally one-sided.

Finally, our hero reached an obelisk. With 3 clues, he could summon a demon lord. As it so happened, he got a third clue in an abandoned library in his previous encounter!

Enter Vorgath the World-Breaker!

I was confident going into this - Roderick actually had an advantage over Vorgath. Roderick had more hp, hit for more damage, and defended on an 8 or lower on 2D6. But he needed a 6 or less to hit the demon lord. Also, the demon lord's powerful blows could knock Roderick to his feet.

There was a stalemate early on - Roderick kept missing but so did Vorgath. But slowly Roderick whittled down his enemy. He also took some wounds, but he usually managed to stay on his feet. Thus, the advantage remained with Roderick.

Finally, the combatants traded hits. Roderick remained standing while Vorgath collapsed and disintegrated into nothingness!

Roderick has now eliminated 4 of the 6 demon lords!

And this game remains a great time-filler for when I don't feel like setting up anything more complex.

Saturday, January 11, 2025

Some Roman Battles

I played around some more with Dominion of the Spear (DotS). In both scenarios, I used the standard army lists in DotS and played the games straight.

Battle of Cannae
I decided to pit Polybian Romans vs. Hannibal's Carthaginian army.

Setup
  • Carthaginians (top) - battle line (L to R): armored elephants, armored spears, cavalry; reserve (L to R): cavalry, spears (I used a LI counter to distinguish the unit from the armored spears)
  • Romans - battle line (L to R): 2 elite armored legionaries, cavalry; reserve: auxiliaries
Elephants at Cannae? Let's call it a what-if scenario.


The Battle
The Romans rout Hannibal's elephants (L) and cavalry (R).

Hannibal brings up his cavalry, which sacrifice themselves to destroy the Roman cavalry.

But the legions are too strong for the Carthaginian spears.

Rome rewrites history and sends Hannibal packing!

Battle of Carrhae
That was quick. I have enough time for another. How about Crassus' Marian Romans vs. the Parthians?

Setup
  • Parthians (top) - battle line (L to R): 3 horse archers (I don't have LC so I used LI counters); reserve (L to R): spears, elite armored cataphracts
  • Romans - battle line (L to R): 2 armored legionaries, 1 ferocious Gallic cavalry; reserve: armored legionaries.

The Battle
The Parthian horse archers wipe out 2 legions! But the Gallic horse routs the other horse archers.

The reserve legion moves up and stymies the horse archers while the Gallic horse ride over the cataphracts!

But the horse archers wipe out the remaining legion. The Gallic horse get revenge, but then decide to retire from the battle.

Much like the real Carrhae, Rome's legions are no match for horse archers!

A DotS Box Set
I am planning a small box set specifically for DotS. It will have 2 armies, the rules, a small board, and dice.

I plan to make counters specifically for DotS, with enough counters to cover any troop type. No more using LI as LC! For now, I'm using a couple spare armies from my MicroBattle set.

Another addition to the box is some terrain, as shown here.

There are no terrain rules in DotS but I think I can come up with something simple. Favorable terrain could give a defense bonus, akin to armor. As far as setup, I think I can use the rules from the 3x3 Portable Wargame as delineated in the first Portable Wargame Compendium.

Thursday, January 9, 2025

And then there were three

Continuing on the fantasy theme, I completed another Demonslayer campaign.

It was another long campaign, with my hero Roderick wandering across much of the breadth of the land. I started at the red star. The red line shows his path and black Xs are encounters. The shield is where he ended.

You may notice the red X. It was an encounter I did in a previous game so I skipped it.

Here is the diary of Roderick's encounters.

Roderick finally met Khazrak, Beast of the Abyss. The game describes him as a "hulking, feral demon with the head of a ram and claws the size of swords."
Generated by Gencraft AI

He was big and slow, so Roderick was able to dodge most attacks. However, Khazrak was very powerful so it was difficult to score a hit. As a result, the battle went for many rounds, with Roderick unable to hit but able to dance away from attacks. Nevertheless, sometimes the combatants would score, and slowly their health drained away. At one point, both combatants were down to 6 hit points. But then Roderick hit with his magic (4 damage) sword and then avoided Khazrak's counterattack. Then Roderick struck the final blow, and Khazrak was no more!

Roderick has managed to take out 3 of the 6 demon lords!

Wednesday, January 8, 2025

The Circle of Thunder

A Ser Killian Micro Dungeon Adventure

Spoiler Alert - This is another adventure loosely based on D&D's Dragon of Icespire Peak. Even so, it may have some spoilers. You may not want to read this if you plan to play that adventure.

The Story So Far
After retrieving the sword of dragon slaying from the dragon barrow, our heroes return to Phandalin. There, they find a shaken Falcon, owner of the hunting lodge in Neverwinter Woods. He tells the party how a band of orcs accompanied by a giant boar destroyed his lodge.

"I thought we took care of that lot," Killian exclaims as he thinks of their adventure at the Woodland Manse.

"I fear not," replies Falcon, "and they are more dangerous than ever. Foul magic spurs their destruction."

Needless to say, Killian pledges to end the threat once and for all.

Approaching the Circle of Thunder
Falcon tells the party that he tracked the marauders back to a stone circle in the woods. He is too wounded to show them so he provides a map.

As our heroes approach the circle's vicinity, a band of blights attack. Killian and Haiden are wounded, but the party wipes out the blights.

Then they run into a band of orcs. The fight is a short and swift victory for our heroes.

Next, a corrupted tree lashes at them with its branches. Killian is wounded in the fight but they ultimately destroy the tree.

Finally, a pack of boars attacks, The heroes manage to drive them off without wounds.

Game Note: I used my Micro Dungeon approach, where there are essentially three levels - the first with 3 possible encounters, the second with 2, and then the boss. For this game, the wilderness approach to the circle takes the place of a formal dungeon.

Meeting Gorthok
Our heroes find the stone circle described by Falcon. In the center are 3 cultists chanting.

"Stop your vile proceedings!" commands Killian.

The cultists scoff and continue to chant. Then suddenly there is a clap of thunder and a massive figure the size of an elephant appears in the circle.

It is Gorthok, the thunder boar, avatar of the heathen god Talos!

The gigantic boar charges the party, bowling them over and knocking them to the ground. Despite this, Killian manages to score a strike. Black ichor flows from the beast's wounds.

Gorthok turns to charge again. Martin calls upon the power of Daeus and smites the beast with holy power. Enraged, Gorthok charges Martin, scoring him with its brutal tusks. Nevertheless, the fighters manage to score more hits.

Again and again, this pattern plays out. Our heroes adjust to Gorthok's pattern and they become adept at dodging the enemy charges. Every time, they score more hits.

Finally, the beast charges Haiden. He dives to the ground under the great boar and drives his sword deep into its vitals. It bellows in rage. Lightning crackles across its body. It begins to dissolve into nothingness, then with a crack of lightning it disappears!

The cultist priests stand shocked for a moment then flee.

"Shall we pursue?" asks Haiden.

"Nay," replies Killian. "This circle is the source of their power. Destroy it and they will no longer threaten the peaceful citizens of the realm."

With that, they proceed to tear down the stone circle. Martin calls upon divine power to shatter the stones then they scatter the remnants in the woods. It is done.

"Now we only have a dragon to deal with." announces Killian.

How will our heroes fare against the dragon? Find out next time!

GAME NOTES
That turned out easier than I planned. They did not use a single healing ability and they still had points to spare. Reasons for this?
  • I based the adventure on the module, and other than Gorthok the encounters were not really that challenging.
  • Still, I probably should have punched up the enemies' hit points a bit.
  • With the way I run the adventure, the party has a chance to bypass some encounters. As it turns out, they avoided some of the more powerful ones - like more cultists and an ogre.
  • I forgot to use some of Gorthok's special abilities.
  • I also rolled extremely well for the heroes. Oh well, I guess they had some holy assistance.

Monday, January 6, 2025

DotS Mania

Looks like I have my first craze of the new year - Dominion of the Spear (DotS).

I wrote about DotS in a recent post. It is a time filler game - one of those games I can pull out and play in a few spare minutes.

Another Experiment
I tried another game of DotS. This time Romans (red) vs. Dacians.

  • Dacians -  Battle line: spears, falx (ferocious foot) and archers. Reserve: falx. spears
  • Romans - Battle line: legionaries (armored foot), archers, cavalry. Reserve: auxiliaries, legionaries

The Dacians attack. The spears (L) cannot make a dent on the legionaries. The Roman archers take out the falx, and the Roman cavalry rides down the Dacian archers.

The legionaries (L) wipe out the Dacian spears. The reserve falx wipe out the archers, and the spears and cavalry stalemate.

The Dacian spears finally drive off the cavalry, but the falx falls to the disciplined legionaries.

Victory for Rome!

As an aside, I decided to do Dacians vs. Romans because I am making a falx for my LARP.

Future Plans
I've been pondering what to do with DotS and I came up with some ideas.

Campaign?
I've been thinking about using DotS for a campaign but I have not made any decisions yet. Just too many interesting armies!

I'm leaning towards one option - sample games from different eras. Neil Thomas does this in his Ancient and Medieval Wargaming book, which includes battle reports for Kadesh (chariot era), Issus (classical), Badon Hill (Dark Ages), and Agincourt (medieval). I will likely break it out into more eras and use different battles.

DotS Box Set?
I am thinking about doing a separate box for DotS. I know, I just consolidated my gaming materials into a couple of boxes! Ah, the joys of GADD.

If I do this, I would only make 2 armies. Perhaps I can use some of the armies that I have on my consolidation chopping block.

I will need to create some more unit because I don't have enough to represent the maximum number for all the troops types. Here is a rundown on what I have and what I'll need.
  • Heavy (melee) infantry - have 3, need 5
  • Light (missile) infantry - have and need 3
  • Heavy (melee) cavalry - have 2, need 4
  • Light (missile) cavalry - have 0, need 6
I'm debating how to handle the cavalry. For MicroBattle, I only made one type of counter and then used markers to indicate if it was light or heavy. I am debating if I should do the same for DotS.

Note that DotS also has chariots, elephants, and camels. I will need to make chariot and elephant counters because my MicroBattle box does not have extras. For camels, I figure I can just use cavalry counters.

I also plan to make markers to indicate elite, armored, and ferocious statuses.

Saturday, January 4, 2025

Christmas at Trenton

'Twas the morning of Christmas and all through the house, the early birds were stirring, looking for something that would not wake the spouse.

One of them (me!) decided to fight a battle. Naturally, Trenton came to mind.

Note: This was my Christmas Day entertainment. I have a backlog of reports from my holiday time off that I will post in January. Stay tuned. Now back to Trenton.

Background
It is December 1776. After losing New York City, the American revolutionary cause is in shambles. General George Washington decides on a bold offensive to (hopefully) restore morale. His army crosses the Delaware River and attacks an isolated Hessian outpost in the city of Trenton, New Jersey in the wee hours of the morning after Christmas.

Setup
Washington's Continental Army enters from the north (top). Washington starts with 3 brigades (Stirling, Mercer, and Fermoy from L to R) plus some guns, all under the command of Nathaniel Greene (the leader counter). Washington also expects 2 more brigades to join him.

Rall's regiment is on duty in Trenton. Lossberg's and Knyphausen's regiments are resting inside the town's buildings (they will come on in later turns).

The Battle
Alarm! Lossberg's regiment leaps to the defense, driving back Stirling's brigade. Washington's army ineffectually bombards Rall. Meanwhile, Stephens (upper left) and Sullivan (lower left) arrive and move to attack from the west.

Note: I am short of heavy infantry counters so I'm using light infantry counters for Stephens and Sullivan. Yet I treat them as standard infantry.

With a concerted assault, Lossberg is lost. Knyphausen's regiment joins the Hessian defense. Washington's artillery continues to be useless.

Rall drives off Fermoy (right). Knyphausen mounts a staunch defense, forcing Stephens and Sullivan to retreat.

Washington moves up his artillery while Stirling and Mercer ravage the town. Actually, I just knocked over a building. ;)

After a lot of bloodshed, the Americans drive back Knyphausen. Meanwhile, Rall's brigade routs and Rall himself is shot!

Surrounded, Knyphausen surrenders!

Game Notes
An American victory, albeit much bloodier than the actual fight.

The idea for a Christmas battle popped into my head on Christmas eve. But what battle? I wanted something apropos to the holiday, so ancients or fantasy did not seem right. Trenton then popped into my head. I tried to find a Command & Colors scenario but failed. Instead, I found this.


This is a scenario book from Greg Wagman of Little Wars TV fame (wow, I mention LWTV a lot on my blogs!). It has a Trenton scenario that I adapted to my MicroBattle rules.

Here is the link to the scenario book.
It's for a miniatures rules set called Live Free or Die.

Now that I have all these Revolutionary War scenarios, I'm tempted to do more for 2025.

Thursday, January 2, 2025

Dominion of the Spear

I've been looking for some fast play wargames for quick games. You might remember my five minute fight experiments on my old blog. I also tried the 3 x 3 Portable Wargame but it did not click for me.

Anyway, I recently came across this over at Wargame Vault.


Dominion of the Spear (DotS) allows the player to complete a pre-gunpowder battle in a few minutes. You set your armies up into zones - left, center, right, or reserve. Then you roll attacks vs. adjacent enemies. A hit eliminates a unit. You can then fill in the line with reserves. Repeat until an army is down to 1 unit and has fewer units than the other.

Test Run
I decided to give it a test. Out of the 196 armies listed in the booklet, the Arthurian army caught my eye. So our first test is Arthur vs. Saxons.

Set-Up
The opposing armies:
  • Saxons (top) - 3 units of spears and 2 units of ferocious spears (they get an attack bonus)
    • Due to the lack of heavy infantry counters, I used light infantry counters to represent the ferocious spears.
  • Britons
    • top (from left) - spears, archers, and cavalry
    • bottom (from left) - spears, cavalry, more spears

The Battle
Each turn, units in the front line fight. Combat proceeds from the attacker's right. In this case, the Saxons are attacking, so I start on the Saxon right (left side of the photo).
  • Left - both are melee units so they roll simultaneously. The Saxon ferocious spears hit but the Briton spears miss. The Saxons overrun the Britons.
  • Center - Saxon melee vs. Briton archers. Naturally, the archers get first shot. They miss. The Saxons attack and hit the archers. Charging through a hail of arrows, the Saxon spears smash into and rout the archers.
  • Right - spears vs. cavalry. Both roll simultaneously. Both miss. A standoff.

The units with hits are removed. Arthur brings up reserves to fill in the gaps.

Turn 2:
  • Left - Briton spears hit the Saxon ferocious spears.
  • Center and Right - the Saxon spears destroy the cavalry units.

After removing casualties, the Britons have 2 units of spears left against 4 Saxons.

Turn 3:
  • Left - the reserve ferocious spears hit the Britons.
  • Center - both sides hit. Mutual annihilation!
  • Left - Without anyone in front, the Saxon spears could perform a flank attack on the center Britons. But they've already been defeated!

And with that, the Britons fall to the Saxons!

Thoughts
Overall, I liked this game. Here are some reasons.
  • It is quick. The above scenario took 6 minutes, including photo time.
  • Armies are small - typically 4 to 6 units. Simple to set up!
  • At first glance, it seems like it would be boring. There is no real maneuvering; just rolling dice. But using reserves to plug gaps satisfied my desire to move units around.
  • I found determining the battle line and deciding which troops to put in the reserve to be a nice mental challenge that makes the game interesting.
  • DotS includes 196 army lists from ancient to medieval times!
Obviously, there are some downsides.
  • There is really just one scenario - line them up and fight.
  • There are no rules for terrain.
I'm OK with these drawbacks. Big ancient battles seem to be of the line them up and fight variety anyway. And often they were fought on flat terrain. Still, I think it may be possible to add some terrain house rules.

Overall, I am pleased with my purchase. They achieve something that I've tried to cook up myself. And I really like the army lists! You may see more DotS battle reports!

Wednesday, January 1, 2025

What's in Store for 2025?

Every year I try to predict where my gaming experience will go. I'm usually way off base, but I find it fun to try.

So how about 2025? Let's peer into the crystal ball.


Here is what the wizard foresees in 2025.
  • Micro Dungeon - I'm very close now so I suspect that I will have rules finalized for my quick play dungeon crawl / fantasy adventures game.
  • More Killian - Assuming that Killian survives Icespire Peak, I'd like to continue his adventures. I have my eye on the Storm Lord's Wrath.
  • More GADD - other than Micro Dungeon, I suspect I'll once again be all over the place in terms of games and eras. Not exactly going out on a limb here.
  • Counter Consolidation - I previously mentioned consolidating my counters. I think it's going to happen.