Saturday, September 28, 2024

Battle of Tarentum

We return to Magna Graecia and follow the exploits of King Pyrrhus.

The Campaign So Far
In his first encounter with the Romans, Pyrrhus did not fare well. His elephants failed him and his cavalry scattered. He was forced to retreat to Tarentum.

The Romans pursued, determined to oust this intruder from the peninsula.

The Forces
I used the same armies as last time.
  • Pyrrhus: 1 cavalry, 3 heavy infantry (1 is inferior Italian allies), 1 light infantry, and 1 unit of elephants
  • The Romans: 1 cavalry, 4 heavy infantry (1 is inferior Italian allies), and 1 light infantry
The Set Up
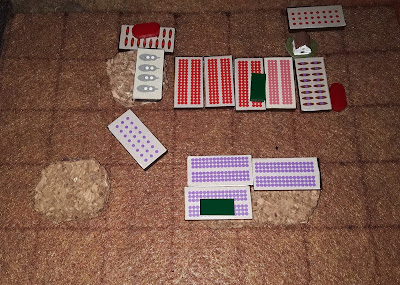
The Romans (red, top) advance along the road to Tarentum. Pyrrhus intercepts them at a pass through the hills.

Notes: 
  • Green markers indicate the inferior allied infantry
  • Pyrrhus is with his cavalry. I used a yellow marker to indicate this but forgot it for this picture.
The Battle
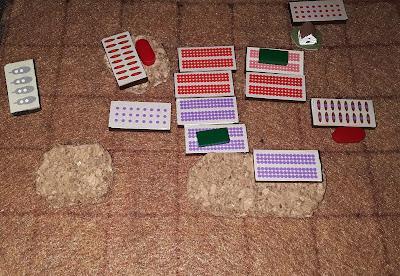
Not content to stay on the defensive, Pyrrhus pushes his army rapidly forward. The Romans drive off Pyrrhus's skirmishers but then he leads his cavalry on a flank charge that decimates the legion.

The Romans attack on Pyrrhus's left. The elephants flee from the Roman light infantry. Fortunately, the phalanx deftly avoid the stampede.

The elephants had to retreat and the phalanx was in the way. I treated the stampede like a successful attack on the infantry. Fortunately, they passed their disorder and retreat saves.

Pyrrhus routs the Roman's allied infantry.

Pyrrhus rushes to his left flank, and finds himself surrounded.

But he breaks out, destroying a legion and routing the Roman lights and cavalry,

Pyrrhus cavalry single-handedly wins the battle! 
They were responsible for all the eliminated Romans.

Aftermath
The Tarentines laud Pyrrhus as a hero and the cities of Magna Graecia flock to his banner. Pyrrhus begins to pursue the retreating Romans.

But Rome's resolve is strong. They call up reserves to reinforce the army.

The stage is set for a climatic battle!

Thoughts
Wow! Pyrrhus's cavalry could do no wrong today! Let's see if they can keep it up in the next battle.

I am going to play one more battle in this campaign. It's win or lose for both sides. We'll see what happens.

Win or lose, I plan to take Pyrrhus to Sicily and face the Carthaginians afterwards.
Saturday, September 14, 2024

1:1 Scale Wargaming

If you are familiar with my old blog, you may have read that wargaming is not my favorite hobby. Actually, it is live action roleplaying (LARP) - 1:1 scale wargaming if you will.

My LARP group has been on hiatus for the summer; it is just too hot in Florida to be running around outside for very long. However, today we are starting a new season.

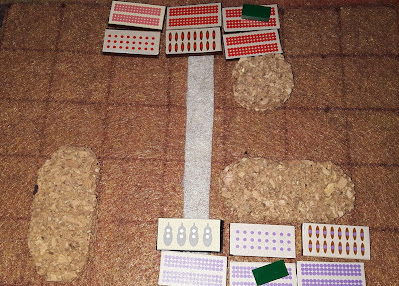
As a preview for this season, here is a picture from last season. I'm in the Roman-looking kit.

Here is the story that accompanies the picture.

Saturday, September 7, 2024

Heraclea-ish

Thus begins my Pyrrhus campaign.

The Campaign
I'm just planning to do a 3-game mini campaign based on Pyrrhus's battles in Italy against the Romans. Although I may do a side excursion against the Carthaginians.

I'm calling the battles Heraclea, Asculum, and Beneventum, but the terrain will be random.

The Forces
I based the armies on the DBA v1 lists, dividing the forces in half.
  • Pyrrhus: 1 cavalry, 3 heavy infantry (1 is inferior Italian allies), 1 light infantry, and 1 unit of elephants
  • The Romans: 1 cavalry, 4 heavy infantry (1 is inferior Italian allies), and 1 light infantry
Set Up
I used my "Big Battles" box, complete with cover.

Big Battles may be a misnomer. My battles occur on a 5 x 7 inch battlefield. I call them big battles because the scenario represents a full-sized battle. Therefore, each base represents thousands of troops.

The omens are not propitious. The dark cat god messes with the tools of fortune.

I'm missing a picture of the initial set up so I will describe it.
  • Pyrrhus: Light infantry and elephants on the left. heavy infantry on some hills in the center, and cavalry with Pyrrhus himself on the right.
  • Romans: Cavalry on Pyrrhus's left, heavy infantry in the center, and light infantry in a village on the right flank.
The Battle
Pyrrhus plans to wait for the Romans (red) to come to him, but he gets impatient and sends his elephants and cavalry to harass the flanks. The elephants drive off the Roman horse but Pyrrhus's cavalry is disrupted by missile fire from the Roman's light infantry.

The elephants crash into the Roman legionaries. Surprisingly, the legion drives back the elephants with losses.

An unexpected result given that the elephants had an extreme advantage. The cursed dice strike!

Shortly thereafter, the elephants attack the Roman cavalry. This time, the cavalry routs the elephants!

Another extremely unexpected result. Again, the dice gods punish Pyrrhus.

Meanwhile, Pyrrhus pushes forward his heavy infantry, but the Romans drive them back to the hill.

Inflicting severe losses.

The Romans trap and annihilate Pyrrhus's cavalry. Pyrrhus just manages to escape.

I don't have a purple leader counter so I just assumed that Pyrrhus was with the cavalry. When the cavalry died, I used a yellow marker to indicate the infantry unit he joined.

I did not use a Roman leader figure. I assumed that the Roman was an average leader and did not play a significant role.

With pressure from the front and the flanks caving in, Pyrrhus's Italian allies flee.

Realizing the day is lost, Pyrrhus sounds retreat.

A decisive victory for Rome!

Aftermath and Analysis.
This sets up the next battle of the campaign. Because of the decisive nature of Pyrrhus's defeat, I don't think it makes sense for him to advance to Asculum. I think the next battle will be outside Tarentum!

The dice gods really had it out for Pyrrhus. I expected more from the elephants, but they twice lost when they needed a 2+ on a D6 to win the melee. Ouch!

Wednesday, September 4, 2024

The Pyrrhus Project

Lately, my gaming has focused on naval and air battles. I'm feeling a desire to get back to land. I've been debating a "project" and have decided on the Pyrrhic War.

The Inspiration
It started with Little Wars TV, specifically their replay of Actium. This stirred my interest in ancient battles. I wasn't interested in a Roman civil war, however, so I started looking for another conflict.

Again, Little Wars TV provided the answer. A couple of years ago they did a Pyrrhic War campaign. Greek phalanxes vs. Roman legionaries, what's not to love?!

The Project
"Project" is a bit grandiose for my current wargaming approach. It's not like I have to go research and order figures then paint and base them. My armies are close to being ready to go.

Here are my armies, organized as half-sized DBA forces.

Top (L to R) - Pyrrhus's army: cavalry, 3 heavy infantry, 1 light infantry with Pyrrhus in back
Bottom (L to R) - The Romans: also cavalry, 3 heavy infantry, and 1 light infantry

I need to add a stand of Roman heavy infantry. But something else is missing. What could it be?


Oh yeah, Pyrrhus had elephants. I have to have some, but my generic counters won't do. I'll have to make some special elephant counters. I don't plan to make elephant counters for every army. Instead, I'll just make a few and use them as needed.

The Campaign
I'm going to do a mini-campaign based on Pyrrhus's three major battles against the Romans.

Little Wars TV (again) provides some great resources for a Pyrrhic campaign, including scenarios for the battles. I don't think I'll be using those resources, however. I will create random battlefields and will use the half-size DBA armies I mentioned above.

Next Steps
  • Create a red heavy infantry counter. I think I have one printed; I just need to apply it to a base.
  • Finish an elephant counter. I only need 1 for Pyrrhus.
  • Play the first game.

Sunday, September 1, 2024

Aerial Experiments

Here are a couple of games using my MicroBattle air combat rules. I'll post about the rules at a later date

Escort
A fighter escorts a medium bomber on a raid into enemy territory.

The defenders (green) approach in antiquated pursuit planes.

Notes: 
  • The attacker is using two mid-century airplanes while the defender has early-century fighters to represent lower quality planes.
  • The clouds are just for decoration.
The escort shoots down one fighter but misses two chances to take out the second. The bomber takes some damage but manages to shoot down the last defender. It then drops its bombs on the target.

Success for the attackers!

Battle Over Britain
I decided to do a test run of my air combat rules using a bunch of planes. I set the dogfight during the Battle of Britain.
  • The British have 4 Spitfires, one piloted by a novice (represented with the early-century airplane because I ran out of prepared mid-century fighters)
  • The Germans have 4 Me 109s and 2 Me 110s (I'm using my gray bomber counters to represent the 110s). One 109 (#4) is a novice.
The Germans (right) approach the coast!

A 110 goes down!

A lot of damage done before the next plane goes down. It's the Spitfire novice.

The 109 novice does down.

At this point, I tested morale of the Germans. They continued to fight, but the handwriting was on the wall. The Spitfires took out the remaining attackers without further loss.

A resounding victory for the British. 

It was also a victory for my approach.
  • The rules worked well despite the larger than usual number of planes.
  • My generic plane counters worked fine as well. It is nice being able to throw together a scenario on the fly without worrying about having the correct figures.